How It Works
It doesn’t matter if we are protecting your Active Directory or a website/app, the process is similar.
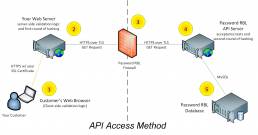
Step 1
One of your customers or employees chooses to create a new account or change their existing account password. When they click submit their computer sends their chosen password to your server.
Step 2
Your server (webserver or Windows Domain Controller) receives the chosen password data and performs server-side validation logic. It is here that you add the few lines of code to utilize the Password RBL REST Web API or deploy Password Firewall for Windows if you’re protecting Active Directory. This takes the password submitted by your user, salts it and then hashes it 30,000 times with the industry standard PBKDF2 algorithm. It then sends the first 5 characters to the Password RBL API Server via an HTTPS request.
Step 3
The Password RBL firewall verifies that this API request is from an active customer by matching the source IP or License Key.
Step 4
The Password RBL API Server performs additional acceptances tests to verify the request is properly formatted and then queries for existence in the Password RBL database.
Step 5
All blacklisted hashes that begin with the same 5 charters are returned and the customer compares this list with the original complete hashvalue to determine if the password is blacklisted.
The Final Decision is Yours
It is your decision how to respond to your customer. If they have chosen a password that exists in the Password RBL database of bad passwords, you may force them to pick a new password, or simply inform them that they have chosen a password that hackers commonly use. The decision is yours!